DIY 6-Inch Rocket Mass Heater: Build Guide for Max Efficiency
TL;DR: Build a highly efficient rocket mass heater with clear steps, meticulous material selection, and precise scaling for effective heating and energy independence.
- Construct an RMH for efficient heating.
- Utilize precise scaling for optimal performance.
- Focus on airtightness for safety.
- Integrate thermal mass for sustained heat.
- Consider site-specific design adaptations.
Why it matters: Rocket mass heaters offer a sustainable, low-cost heating solution by efficiently burning wood and storing heat, reducing reliance on fossil fuels and providing warmth for extended periods.
Do this next: Research local building codes and material suppliers for high-temperature components.
Recommended for: Those seeking a sustainable, off-grid heating solution with advanced DIY skills.
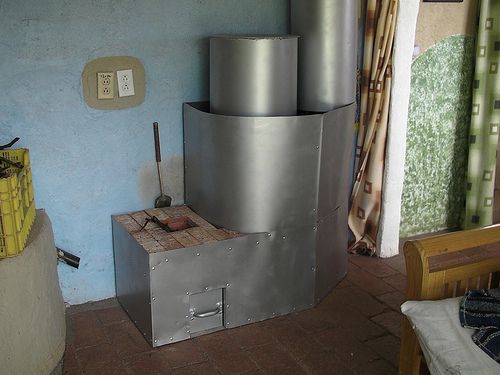
This Instructables guide provides a detailed, step-by-step tutorial for constructing a rocket mass heater (RMH) designed around a standard 6-inch diameter flue, emphasizing precise scaling for optimal combustion efficiency and heat retention. The build focuses on creating a high-efficiency wood-burning system that stores heat in a large thermal mass, ideal for off-grid or regenerative heating in passive solar or earth-sheltered homes. Key components include the burn chamber (smallest cross-sectional area for intense combustion), heat riser (taller for larger areas to ensure complete fuel burn), manifold, and extensive mass bench for 24-48 hour heat release. The guide stresses that all parts must not exceed the flue's cross-sectional area to maintain draft and prevent backdrafting; for different flue sizes, users must research proportional rescaling. Construction begins with framing the firebox using 2x4 lumber uprights and plywood base. Specific steps: Cut sheet metal to form the burn tunnel—start by screwing metal to the back upright, bending around corners, and cutting a 7.5-inch by 6.5-inch ashtray rectangle 6.25 inches from the front-left corner. Secure the ashtray frame inside the hole with high-temperature silicone for seams and base to ensure airtightness. The drum section follows, integrating a metal barrel as the heat exchanger, topped with perlite-clay insulation and cob mass. Detailed assembly includes positioning the J-tube (feed tube, burn tunnel, riser), insulating with ceramic fiber blanket, and encasing in cob or brick for thermal mass. Materials list covers sheet metal (26-gauge), firebrick, high-temp silicone, and insulation. Performance insights: This design achieves near-complete combustion, minimizing smoke and maximizing heat transfer to mass, suitable for integration with passive solar gain or greenhouses by routing exhaust through cob channels. Field-tested for small spaces (e.g., tiny homes), it burns minimal wood (e.g., twigs) for prolonged warmth. Safety notes include proper venting and CO monitoring. Practitioners gain concrete blueprints for replication, troubleshooting tips like adjusting riser height for flue size, and mods for cooktop integration. Total build time: 20-40 hours for DIYers with basic welding/cob skills. This resource equips regenerative builders with actionable specs beyond basic overviews, enabling efficient, low-fuel heating in permaculture contexts.